|
 Appointment types or categories allow you to define blocks of time for a specific type of appointment or activity (e.g. Med Evals). You can then schedule patient appointments within these blocks of time. Appointment types or categories allow you to define blocks of time for a specific type of appointment or activity (e.g. Med Evals). You can then schedule patient appointments within these blocks of time.
Setup categories
| 1. | Select Appointment Types List from the File menu. |
| 3. | Type a name for the category in the Type field under Add Appointment Type. |
| 4. | Click the down arrow button to select a color in the Code field. down arrow button to select a color in the Code field. |
| 5. | Click Save. The color and the type are listed in the Appointment Types window. |
| 6. | Click the Close button when you have finished entering Appointment Types. Now that you can schedule blocks of time by Appointment Types or categories. |
To edit an appointment type, select it from the list and click Edit.
Click Delete to delete a selected appointment type.
Schedule blocks of time by Appointment Types
To define your time blocks within the scheduler, select a beginning time slot in the Day of Week View, or drag mouse down over slots to highlight a block of time.
| 1. | Select New Appointment...Schedule Appointment Type from the menu, or right-click and select Schedule Appointment Type. |
| 2. | Select an appointment type from the drop-down list. Click Ok. |
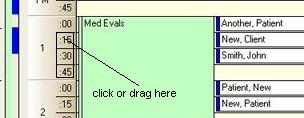
Once a block of time is scheduled for a specific activity, you can create appointments within this block. Select a beginning time slot within the block of time defined above, by clicking an appointment time on the time bar or drag your mouse over the slots to highlight a block of time.
| 1. | Select New Appointment...Schedule Patient, or right-click and select Schedule Patient. |
| 2. | Enter end time and other information as needed. Click Ok. |
Search for Available Time in an Appointment Type
You can search Appointment Types for the next opening for a specific provider.
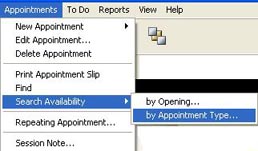
| 1. | From the Appointments menu, select .Search Availability...by Appointment Type. |
| 2. | Click the down arrow for a pick list of Appointment Types for 'Find 1st Available Appointment for.' Select a type from the list. |
| 3. | Enter the length of time for the appointment in minutes (e.g. 60). |
| 4. | If you are the Administrator, click the down arrow and select a provider. If you are a provider your name appears in the provider field. |
| 5. | Click the Search button. If there is availability, it will be listed with the date and the start and end times. |
| 6. | Select a time, and then click the Go To button to close the window and go to that time slot in the Scheduler. |
Click Cancel to exit without going to a selected date and time.
|