The patient's name and the note type appear at the top, left of the window.
Clinical sections relevant to the note or plan type are listed on the side menu bar. When you click the text a graphic pencil appears so you can easily see which sections you've addressed.
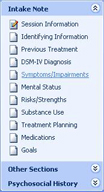
Click the headers or Bar Captions to open additional sections, such as Other Sections or Psychosocial History.
Enter Note Data and Preview the Note
![]() While doing a note or treatment plan, click Preview for an instant view of your note's progress. The Preview generates your note at any point during the process or at completion.
While doing a note or treatment plan, click Preview for an instant view of your note's progress. The Preview generates your note at any point during the process or at completion.
From the Preview you can send your note to one of the following:
Word Processor
printer
Portable Document Format (PDF)
Generate Note/Report
![]() Click to open the Generate Note/Report window to select and order the sections you want to include, as well as select page headers and other options. If you have a set order of clinical sections that you like to use each time you generate a note or report, you can set up sequences and save time when generating your notes.
Click to open the Generate Note/Report window to select and order the sections you want to include, as well as select page headers and other options. If you have a set order of clinical sections that you like to use each time you generate a note or report, you can set up sequences and save time when generating your notes.
Search Notes and Reports for Word or Phrases
![]()
You can search for a specific word or phrase by typing in the field and clicking the find button next to the field. Click the find next button to search again for the next instance of the word or phrase.
![]() Click the Print button in the Preview window to print the note or report.
Click the Print button in the Preview window to print the note or report.
Send to Word Processor
![]() Click the Send to Word Processor button to send the note or report your word processor.
Click the Send to Word Processor button to send the note or report your word processor.
Portable Document Format (PDF)
![]() Click the Send to PDF button to create a PDF file or your note or report. PDF is a universal file format that can be opened in Adobe® Reader. If you do not have Adobe Reader, it can be downloaded for free from the Adobe Reader web site, home page.
Click the Send to PDF button to create a PDF file or your note or report. PDF is a universal file format that can be opened in Adobe® Reader. If you do not have Adobe Reader, it can be downloaded for free from the Adobe Reader web site, home page.
To generate your note or report select File...Send to... Your note or report is generated as you see it in the Preview window. If you send it to a printer or a PDF file, you will not be able to edit it.
You may edit it or attach another file to your note by sending it to the Word Processor. However, be aware that changes made in the word processor will NOT be reflected back to the database. For example, if you change the Diagnosis in the word processor, it will not be changed in the database. To change the record in the database, click on Note, open the clinical section, and make any necessary changes.
Note
![]() The Note view contains the clinical sections for entering data. You can arrange the clinical sections of your note or treatment in a specific order when generating it. You can also customize the side listbar for specific sections to be listed.
The Note view contains the clinical sections for entering data. You can arrange the clinical sections of your note or treatment in a specific order when generating it. You can also customize the side listbar for specific sections to be listed.
From the Note view select File...Generate Note...
The Generate Note/Report window allows you to select and order the sections you want to include, as well as select page headers and other options. If you have a set order of clinical sections that you like to use each time you generate a note or report, you can set up sequences and save time when generating your notes.
Edit Pick Lists
![]() Click on the pick list icon in the upper right corner of the screen.
Click on the pick list icon in the upper right corner of the screen.
![]() Spell Check Documentation Sections
Spell Check Documentation Sections
For Intake, Progress, Discharge Notes, Group Notes and Treatment Plans: While your cursor is in any text field or drop-down field, select Spell Check from the File menu, or click the Spell Check icon.
Spell Check checks only active fields. You will need to move your cursor from field to field to spell check all text fields.
To replace a misspelled word, select a correction from the Suggestions list, if listed, and click Change. Click Change All if there is more than one instance of the misspelled word. You can also type your correction in the field, and click Change.
Click Ignore or Ignore All to ignore the misspelled word.
Click Add to add an identified misspelled word to the Dictionary.
See Also