General Preferences
Select Preferences from the Setup menu in the Patient window.
![]() Reminders at Start Up
Reminders at Start Up
If you don't want Reminders to display at start up, un-check the Reminders check box. You can toggle it on or off.
Notification for Treatment Plans
Select Preferences from the Setup menu. Reminders will display treatment plans due within fourteen (14) days by default, provided you have entered the due dates. To change the setting enter the number of days you prefer in the number field for Treatment Plan Notification. Click OK.
Tasks tab display option
Check the box to display tasks that have been marked as completed in the Tasks tab of the Patient window. These are tasks that you schedule from the Patient menu for specific clients.
![]() Retain Messages
Retain Messages
Messages can be sent by other QuicDoc users on a network. Once read they are stored, and can be accessed by clicking the Old tab in the messages dialog box. You can set the number of days that you want to keep these messages stored. Use the spin buttons or type a number in the field.
Sessions/Notes - Display Current Incident
You can display notes and treatment plans for only the current incident of care, or all incidents of care for your patients in the Notes Hx tab in the Patient Window. Use the options buttons to change this setting.
When you generate notes (e.g., Intake Notes) your data is read from the database and compiled as a word processor document using the RTF (Rich Text Format) standard. These document files are then loaded, by default, into QuicDoc's Word Processor. You can open and load the document into any word processor that supports RTF files.
Note: If you are planning to use the document template and mail merge features in QuicDoc you will need to have QuicWord set as your default word processor.
To use another word processor:
| 1. | From the Setup menu, select Preferences, Links tab. |
| 2. | Click Other Word Processor option button. |
| 3. | Click the file button to the right of the field. |
| 4. | Select the filename and location of the executable file which starts your word processor. For example in Windows XP the filename for Microsoft Word is WINWORD.EXE |
| 5. | Click OK to save. |
Attachments Message
Enter location to save attachments - This message will appear if you click OK to save settings but a location to save attachments has not been set up. If you are on a network, check with your System Administrator for guidance in setting up an attachments location.
Links
From the Setup menu select Preferences, and click the Links tab to set up the data exchange for Office Therapy.
Office Therapy Database
Select the Server Name or IP Address for your Office Therapy database. Click the Refresh button to the right of the field to populate the pick list to select the Server or IP Address.
Select the name of your Office Therapy Database. Click the Refresh button to the right of the field to populate the pick list. Once the Database name is selected, click the Test Connection button for verification.
Default Provider
Select a Default Provider from the drop down pick list. The default provider will be associated with imported patients/clients. If you are a solo provider and have already entered yourself as a provider in QuicDoc, set yourself up as the default provider.
![]() Note: While you may have the same provider entered in QuicDoc and Office Therapy, if you entered them separately in each system (not using the import), there is no link established between them. The only way to establish linkage is to import from one program to the other.
Note: While you may have the same provider entered in QuicDoc and Office Therapy, if you entered them separately in each system (not using the import), there is no link established between them. The only way to establish linkage is to import from one program to the other.
Automatic Export/Update
Click the option to automatically export client data to Office Therapy and to automatically update information. If this option is selected, when you add a client in QuicDoc, it will automatically export to Office Therapy. If you change demographic information for a patient in QuicDoc, the information in Office Therapy will also be modified. This automatic export function will also apply to new insurance companies and referral sources.
Use Office Therapy Authorizations
If checked, this option will turn off the authorization tracking feature in QuicDoc so that there is no possibility of errors in the session counting for authorizations.
Use Office Therapy as the default view in scheduler
If checked, when opening the Scheduler in QuicDoc you will see and be able to use the Office Therapy Calendar to schedule your appointments.
Use Office Therapy for appointments in Reminders and Next Appointment
If you are using the Office Therapy Calendar for scheduling you should also be sure to check this box. This enables you to use the Reminders as well as the Next Appointment feature based on Office Therapy scheduling.
![]() Lexi-Comp Drug Information Database
Lexi-Comp Drug Information Database
| • | From Setup menu select the Preferences, Links tab. |
| • | For Older Versions on CD select Lex Original, and then enter the Drive letter of your CD-ROM Drive. The Lexi-Comp CD needs to be in your CD drive in order to access the database. |
| • | For Newer Datasets included in the QuicDoc program software, select the option for Lexi Complete. |
| • | Click OK to Save. |
Preferences Administrative tab (Administrative logon)
Passwords
QuicDoc will Remember Passwords at Logon if the option is checked. HIPAA requirements should be considered before choosing this option.
You can allow individual users on a network control of the password option by checking the Allow User Control check box.
Electronic Record
If you want to use QuicDoc as an electronic record, eliminating paper charts, use this option. Clinical notes and reports created using this feature cannot be edited or deleted once they are signed or committed. Changes are made in an addendum.
Click on the check box in the to Enable electronic signatures.
Check Require Supervisor to sign off if a supervisor is to be given control of finalizing records. Supervisors are set up in the User setup window.
Word Usage - Client, Patient, Other
You can select whether reports and notes identify people as patients or clients, or you can enter another identifier, such as resident. Click option for Patient or Client, or click Other, then type your choice in the text box.
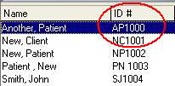
Account #
You can change the label for the Account #, for example, to Hospital or ID #. Type in the field, limited to 20 characters. The new label appears in the patient list in the Patient information window. It also appears next to the name label above the patient list. You may need to refresh the screen by clicking on another view then back to see the change.
Social Security and Phone Number formats
Social Security and Phone Number formats are flexible to be used outside of the US.
SSN - To change the label and format for Social Security Numbers, Type the name for the Label in the field.
Use the mask character key to format the new number. The limit is 11 characters including dashes.
A for letters only
N for letters and numbers
# for numbers only
- for dashes
The new format will appear in the patient list next to the Account number. You may need to switch to another view and back to refresh the screen.
Phone Numbers - Select a mask from the pick list for the proper country.
![]() Click the button to the right of the field to open the pick list. Select a format, and click Ok to save.
Click the button to the right of the field to open the pick list. Select a format, and click Ok to save.
Audit Log Settings
Click to check this option if you want to enable the Audit Log to track and audit activity in the program. Checking this option allows you to view Audit Reports.
See Audit Log
Postal Code
You can select a Mask for the zip or postal code that you will be using. Use the drop down arrow to open the pick list to select a format.
Define where you want attachments to be saved.
Use the browse folder button to navigate to the folder, or type it in the Location field.
![]() Note: Enter location to save attachments - This message will appear for all end users, administrative and clinical, upon clicking Ok to exit the Preferences window, if a location for attachments has not been set up. The System Administrator should set this up before other users attempt to set up their General Preferences.
Note: Enter location to save attachments - This message will appear for all end users, administrative and clinical, upon clicking Ok to exit the Preferences window, if a location for attachments has not been set up. The System Administrator should set this up before other users attempt to set up their General Preferences.
e-Prescription
Once you have signed up for e-Prescribing which is a subscription based service, you can set it up in the the e-Prescription window. This requires the Administrative logon. From the Setup menu select Preferences, then click the e-Prescription tab.